|
|
The MZ-N1
Apart from its NetMD high-speed-music-transfer capabilities, the N1 is a fully-functional (and fantastic) MD unit in its own. There is not a single feature on the MZ-R909 (the N1's predecessor, and previously the most feature-rich Sony MD portable to date) that is not present on the MZ-N1. In fact, if you take the time to compare the two units, you'll find that the N1 is essentially a R909 with a redesigned body - the two units are almost functionally identical. (The separate BEEP settings for the main unit and remote, the group number display on the LCD in group mode, and the ability to charge the unit in the stand during usage were the only three real differences I could find on the main unit).
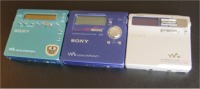
From left-to-right: the Sony R900, R909, and the N1.
Physical Design
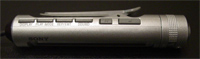
Sony has finally broken out of the cookie-cutter body mold that was used for the R90/91, R900, and R909. While the previous 3 generations of flagship recorders were "square" with flat edges and nothing-but-90-degree corners, the N1's body features curved edges and angled corners. The body is constructed of magnesium-alloy panels (to slim down on its weight, from the standard aluminum body). Gone is the chrome "trim" around the edge of the unit; the top and bottom panels of the body now close together flushly. The LCD is slightly smaller, however nothing is lost in the display, as everything is slightly scaled-down in size to fit the smaller window. The round, conspicuous control pad is gone; in its place is a new, slim, "rocker-switch" control bar, which takes up less space on the unit's face. The Sony and Walkman logos are now chrome-stamped. The result is a clean, sleek looking unit with futuristic hues to its design.

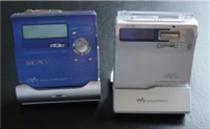
A Sony MD generation-and-a-half:
The MZ-R909 and MZ-N1
The N1 measures 78.7 mm x 71.8 mm x 16.9 mm at its slimmest portions (maximum dimensions due to protrusions are 79.1 mm x 73.8 mm x 19.9 mm), and it weighs a paltry 117g with the battery (90g without). If you've been using the same Servired leather case since the R90/91 (like I have), you might need a new one, as the N1 is a little small for the case for the R90/900/909. The N1 is noticeably lighter in your hand than the R909; however the extremely light weight of the unit actually makes it feel a little less "solid" than the R909 and R900. Generally the N1 feels well contructed, however when you close the lid, it doesn't close with the same "snap" that the R909/R900 does. The solid, rigid feeling just isn't there when closing the lid, however this is something that you will probably get over pretty quickly, as the incredibly small size of the unit will amaze you.

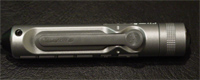
Discs are inserted from the top of the unit
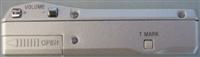
The Sony engineers did a great job of giving the face of the unit a clean look, but some of the controls could have been laid out in a more ergonomic fashion. The main controls are laid across the upper portion of the N1's face. The jog dial remains embedded in the top-right of the body; the volume buttons have been moved to the left edge of the body (where the T Mark and END SEARCH buttons were located on the R909). The Track Mark button has been moved down to the lower half of the left edge of the unit, and is now a smaller, plastic button that doesn't protrude much (if at all) from the body. This is the one button I have a hard time pushing (the rest of the buttons on the unit are fine), although maybe this is a good thing, since the T Mark button isn't something you want to be accidentally pushing in.
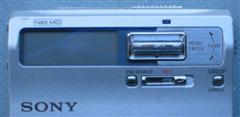
Close-up of the N1's face LCD and controls
The new rocker-switch control bar sits to the right of the N1's LCD; the left, center, and right sides of the bar can be pushed in (for |<<, PLAY, and >>| respectively), and the bar can be "rocked" up and down (for PAUSE and STOP). The design of this new controller mechanism is not without flaw - although it is easier to push the center position more accurately than with the R909's flimsy feeling control pad, it is somewhat difficult to push up and down on the control bar with certainty. Due to the placement of the bar (just half an inch above the RECORD slider-switch), it is particularly difficult to start a paused recording - you need to slide the record switch while holding UP on the rocker bar... not an easy task to pull off if you've got big thumbs. It would have been better to place the pause button in place of either the END SEARCH button or the GROUP button for this purpose. Overall, I personally find the layout of the controls aesthetically pleasing but ergonomically-challenged.
The jog dial still allows you to search through the track titles while playing a track, and pushing the jog dial in before turning it enters the N1's complex menu system (which is virtually identical to the R909's menu maps, with the exception of the MAIN UNIT and REMOTE options under BEEP in OPTIONS). Pushing the GROUP/CANCEL button will exit the menus completely; unfortunately there is still no way to just go back one menu level (it would have been nice to designate one button as a "back" button).

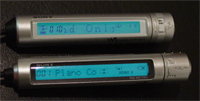
The N1's 3-line text display
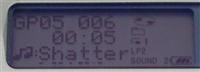
The slightly-scaled-down LCD window features the same 3-line text display as the R909, which does an excellent job of displaying all of the info that you want to see. One minor improvement with the text display is that [when GROUP mode is on] the first line will show the group number in front of the track number. The indicators/text are again black (the R909's display text/indicators were blue, and as a result were not quite as easy to read), but the display still does not have a backlight. However, when held at certain angles to light, the coating of the LCD window has a very slight blue tinge to it; this is probably what gave the LCD on the N1 press photos the blue tint (that some thought was a backlight). Needless to say, this effect is slightly exaggerated in the N1 press photos.
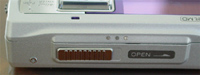
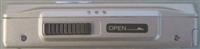
The N1's Open slider-switch
The OPEN switch still sits on the top of the unit, but is now a slider, instead of a button. This was probably a good idea, since you normally find yourself pushing down on the top of the unit to get it out of the USB cradle, and you don't want to accidentally open the lid in doing so. Sliding the OPEN switch will open the lid and eject the disc in one single motion ("One-touch-eject"). The battery door is still in the top-left corner; this was by far the flimsiest part of the R90/900/909's design. Only time will tell if Sony has improved on the battery door, although it appears to be very similar to the [flawed] design of the battery door on the R90/900/909. On the back of the unit, the HOLD switch sits by itself (like the R909, the SYNCHRO switch is now a soft option in the menu system), along with a small nook that helps the unit latch onto the USB cradle.
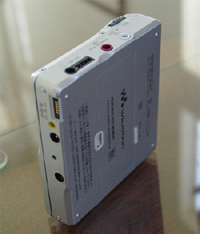
Angled shot of the N1 showing all of the connectors
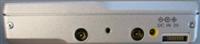
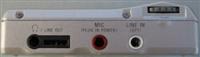
The input/output audio jacks are aligned on the right edge of the unit (as with the R900/909): Line-in/Optical, mic-in, and headphone/remote/line-out. The headphone/remote jack has been moved up away from the edge of the unit by about a quarter-inch. The result of this is that [when plugged in] the remote plug no longer protrudes past the bottom edge of the body (good move here). The bottom edge of the unit houses the familiar external battery case and DC power supply connections; in addition, the data connection to the USB cradle sits on the bottom right of this edge.
Four edges of the N1 - top, bottom, left, and right
The USB/charging cradle locks the N1 in place, holding it in firmly even if you turn the cradle upside-down with the unit docked (although if you try this, and your N1 falls out, and hits the floor and breaks, I am not liable). The cradle comes in one piece - no assembly required, unlike the R909's cradle. Due to the presence of the 6-pin connector, older MD units won't fit into the N1's USB cradle. When the N1 is in its cradle and connected to the PC, you will see "PC --> MD" on the display, and none of the controls on the body will work, other than the volume buttons.
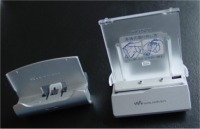
R909's charging stand on the left, the N1's USB/charging cradle on the right
The USB jack and DC power jack are located on the back of the USB/charging stand.


Shots of the USB cradle, showing the USB and power connections
Battery Details
When the AC adapter is plugged into the cradle and the N1 is docked, the NiMH (Nickel Metal Hydride) battery will charge. Unlike the R909's charging cradle, the word "charging" actually flashes on the display, along with the flashing battery icon. (Due to the new 6-pin USB cradle connector, the unit can now tell if the power supply is the external battery case or the USB/charging cradle.)
The unit can also be recharged by plugging the adapter straight into the main unit's DC jack and pushing STOP/CHG (down on the control bar/rocker switch). Charging an empty battery takes about 3.5 hours using either method. It does not appear that either method will discharge the NiMH cell before recharging it (as some of the newer Sharp units do, to prevent "memory-effects" on the battery). It does appear that the USB/charging cradle will charge the battery even if the unit is in use! Unfortunately, if you place the N1 with a fully-charged battery on the cradle, it will still go on charging for the full charge time. And there is no way to tell the cradle to stop charging.
Sony MZ-N1
Battery Life
|
NH-14WM
(playback / recording)
|
AA battery
(playback / recording)
|
NH-14WM + AA
(playback / recording)
|
SP:
(stereo or mono)
|
30 hrs
|
12 hrs
|
44 hrs
|
12 hrs
|
79 hrs
|
30 hrs
|
|
LP2:
|
38 hrs
|
17 hrs
|
52 hrs
|
19 hrs
|
95 hrs
|
43 hrs
|
|
LP4:
|
42 hrs
|
21 hrs
|
62 hrs
|
23 hrs
|
110 hrs
|
52 hrs
|
Sony MZ-N1 battery life figures, taken from the user manual, as measured by the JEITA standard (Japanese Electronics and Information Technology Industries Association). I am aware that these numbers are different from the figures given in the N1's original product announcement (back in September), which gave the SP battery life as 28hrs playback/11hrs recording. This is a discreptancy that I cannot explain.
The N1's internal battery life is amazing, as Sony quotes 30 hours of playback and 12 hours of recording (in SP mode, slightly longer for the LP modes) on the internal NiMH cell alone (of course we all know that due to various factors, "real-life" battery times are a few hours less than what is quoted).
This is slightly improved over the R909's 24 hours of playback/8.5 hours of recording. It's hard to imagine that only 3 years ago, the same NiMH battery supplied the MZ-R55 with a measly 4 hours of playback on a full charge. Sony has sure done a good job optimizing the low power consumption on these toys.
The external battery case attaches to the same place, in the same manner as on the R909 and R900 (a single "screw" tightens and holds the case tightly in place). The case holds one AA sized battery, and using an AA cell supplies an extra 49 hours of playback/18 hours of recording.
New Remote Control (Kanji/Hiragana enabled)
The Japanese model of the N1 comes with a slightly redesigned remote that is equipped with a larger text display, which can display multi-byte characters (Japanese Hiragana and Kanji), in addition to Roman characters and Katakana.
The remote itself is bit slimmer (model# RM-MC12ELK), as the headphone jack has been moved to the head of the remote (where the STOP button used to be), and the stop button has been moved next to the PAUSE button (aligned with the rest of the remote's buttons on the top side). The display still features a backlight for easy viewing at night, which lights up at the push of any button. The light stays on for 2-5 seconds (depending on the button pushed - only 2 seconds for the volume buttons, longer for others), and if a title is scrolling in the display, the light will stay on until the title has completely scrolled through.
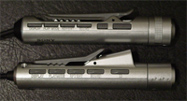
Shots of the R900/R909's remote (RM-MC11EL, bottom)
and the N1's newer, slimmer remote (RM-MC12ELK, top)
The head of the remote still twists to control tracking (twist the head of the remote either way to start playback); if you pull the head of the remote out, you can then twist the head to control volume. This is now labelled under a clear plastic window on the head of the remote.
The plastic clip on the back of the remote holds it firmly to a shirt pocket (or any other article of clothing that you choose to clip it on); the clip is fairly strong and does its job well. The HOLD switch is located on the bottom of the remote, and prevents any accidental button-pressing when turned on (the main unit has a separate HOLD switch, and the two HOLD switches act independently; the remote's HOLD switch does not affect the buttons on the main unit, and the main unit's hold switch does not affect the buttons on the remote).
Top, buttom, and rear views of the new remote
The buttons across the top of the remote are DISPLAY, PLAY MODE, RPT/ENTER, SOUND, PAUSE, and STOP. A number of the remote's buttons double as other functions:
- Holding the DISPLAY button for 2 seconds will get you into the remote's menu system - not quite as complex as the main unit's menu system, but includes the essentials, including the ability to switch between displaying the single-byte layer and multi-byte layer of track/disc titles.
- Holding the PLAY MODE button for 2 seconds is equivalent to pushing the main unit's GROUP button - this will put you into GROUP search mode - the GROUP (folder) icon will start flashing, and you will be able to skip through the first tracks of each group. Of course if you don't have any groups defined on the disc, this won't help much. This works even if GROUP mode is turned off.
- Holding the SOUND button for 2 seconds allows you to adjust the bass and treble settings of the two sound presets.
- The STOP button still acts as the "ENTER" button during menu navigation and titling operations (so does the RPT/ENTER button).
The new remote's display features a text-display area for larger characters for displaying Kanji - 11 x 12 pixels for each character - however only 6 characters can be displayed at once in normal display modes (as can be seen from the photos below).
Text scrolling is no longer smooth (as it was on previous Sony stick remotes) - instead, the titles now "step" across the display, much like they do on the main unit.
The text/indicators in the remote's LCD are now blue (instead of the black used on the main unit's LCD).


Two different English font types
The remote uses a slimmer, more efficient font for English words in the menu (works like "TRACK ERASE" and "MELODY TIMER" fit into the display without the need to scroll), however during normal display modes (ie, during playback, displaying track/disc/group titles) the font for English characters is wider (to fit the 11x12 pixel character space).
As a result, if you don't own any MD's with Japanese/Chinese titles, you'll find that much of the larger text-display space is wasted, and that the new remote's display is actually worse for viewing Roman (English) characters. It will be interesting to see how Sony handles this remote for the North American/European release of the N1 - perhaps they will redesign the text display area, or simply include the older remote with the N1?
Details about Kanji title display/input on MD's
(Skip this section if info on titling in Japanese Kanji doesn't interest you, as it will surely be confusing)
MD editing software has allowed for using Kanji (Chinese characters) in track/disc titles for years now, when used with certain MD units. If you're not familiar with how MD's store Kanji titles then this may be a bit confusing to you. But basically there have always been two layers for track/disc titles: the single-byte layer and the multi-byte layer. Most MD units (and all US/European model MD units) use only the single-byte layer, which is capable of storing Roman characters as well as Japanese Katakana (the simplest of the 3 Japanese character sets). Since this is all that is required by most of the English-speaking world, access to the multi-byte layer of an MD's title area is usually removed from the non-Japanese versions of MD editing software (such as Sony's MD Editor, Media Communicator, and M-Crew software programs).

Kanji display on the Japanese N1's remote
However there is also a multi-byte layer that is capable of storing the more complex Japanese Kanji (Chinese characters) and Hiragana, as well as English letters and Katakana. ALL minidiscs are capable of storing multi-byte (Kanji) titles, but not all MD recorders are capable of displaying them (and even fewer MD models are capable of actually writing the multi-byte layer). The only way to write to the multi-byte layer is to use software that interfaces with your MD unit, along with an MD unit that supports it. Some MD models that display multi-byte layer (Kanji) titles that come to mind are the Japanese models Sony MZ-E909 (player-only portable), and recent Sharp portables - MT832, MT77, and MT770/880 (but only on the remotes of those units). The Japanese model Sony MDS-PC3 (which comes with the M-Crew software) is capable of both displaying and writing Kanji titles, as is the Japanese model MZ-N1.
So does the N1 support *writing* titles in Kanji?
Yes it does. However this can be a little confusing. First of all, you must have the language in your Windows OS set to Japanese when you install the OpenMG Jukebox software, so that the installer will select the Japanese version of the software. This should work properly in Windows 2000 and Windows XP (home and pro), I'm not sure about the Japanese language support in Windows 98 or other versions. If you install the English version of the software - which is what happens automatically if the installer detects that the language of your OS is set to English - then you will not be able to enter Kanji titles, even if you activate a Japanese IME. You still appear to be able to acess the multi-byte layer in the English install of the software, but this appears to be a bit glitchy when you actually try to transfer Kanji to the MD.
The following text is copied from a couple of e-mails that I received from readers, which helped me straighten out the details in getting Kanji titling to work with the N1:
--------------------------------------------------------
[from Tobias Diedrich [[email protected]] in Germany]:
I was on holiday in Japan for two weeks until a week ago, and because my old MZ-R30 is falling apart after over 3 years of constant use I bought myself a MZ-N1. We were travelling as a group and one of the others bought himself a new Notebook, of course preinstalled with Japanese Windows. So, eager to test the MZ-N1 we installed the Software on it and tried it. The Software was in Japanese, but despite of our little knowledge of this Language it was not to difficult to use. You could even use Kanji to name the Tracks, which would then show up on the remote. So far so good. Back in germany now, I installed the Software on my german Windows 2000 and was surprised to find the installation process and the software to be in english. So obviously the installer decides which version to install depending on the default locale of your System. Knowing that Windows 2000 works very well with Japanese applications if you switch to the Japanese locale I did that and installed the Software again. As expected the installation process was now in Japanese and the Japanese version of the software was being installed.
After that I did a few tests to find out which version(s) would work properly with Kanji. Sadly only the Japanese version works correctly and even only in a Japanese locale. But if this is met you can not only input Kanji but transfer these titlenames to the MZ-N1 without problems.
So in the end the statement you write in the section "So does the N1 support *writing* titles in Kanji?" is not completely true [BY: this has now been corrected]. It does support it, but only with the Japanese software in a Japanese locale (i.e. a Japanese Windows or any Windows 2000/XP switched to japanese locale). So... You may ask how to switch to the Japanese locale? In case you did not know this already, go to the language settings and use the default button to bring up the global language settings dialog. Set this to Japanese. However, this will cause trouble with other encodings (i.e. German won't work right), but if you only use english (i.e ASCII is enough, you don't need ISO-8859-1) you should be fine.
[from Maximilian Rehkopf [[email protected]]]:
The problem you may have is that you use an OS the codepage of which is NOT set to japanese (932). The OpenMG Jukebox will then switch to english mode (as you describe) and will be unable to handle 2-byte characters correctly. Once the OS's standard codepage (and maybe region) is set to japanese, OpenMG Jukebox would operate in Japanese language, and handle 2byte characters correctly as well. This is not a hardware problem of the N1. (I am referring to W2k/XP here. W98/Me do not allow to change any codepage or something, so you would be stuck.) So, either a native japanese W98/Me or (any origin, but set to japanese) W2k/XP is required for OMG Jukebox to handle the SJIS characters properly.
--------------------------------------------------------
Displaying Kanji titles on the MZ-N1
Multi-byte titles can only be displayed on the remote. The main unit's LCD will only show the single-byte layer title. Once you input a Kanji title to the MD, the new remote has two options for displaying titles with multi-byte characters (this is the only setting in the remote's OPTIONS menu that is in Japanese). The first option displays the multi-byte layer only, while the second option will display the multi-byte title first, then follow with the single-byte layer. If the title in the multi-byte layer is blank, then the remote just shows the single byte layer title.
Will the US/UK models support Kanji title display?
First of all, I do not know if the US model of the MZ-N1 will have the capability to display Kanji (multi-byte layer) titles on its remote. Sony may leave this display capability in the unit/remote (I believe the firmware support needs to be in both), or they may take it out (which I figure to be likely). Even if they leave this feature in, you will will need a different MD unit to write Kanji titles, since this is not supported on the N1.
Just for reference, the US version of OpenMG Jukebox 2.2 (which some astute users downloaded separately in anticipation of the N1's release) only allows access to the single-byte layer. Most likely this will also be the case with the version of the OpenMG Jukebox included with the European and North American release of NetMD in the Spring.
So how do I type Japanese on a US version of Windows?
This is getting somewhat outside the scope of this review, but if you're really interested...
To type Japanese on a system running English Windows, you need to install a Japanese IME (Input Method Editor) onto your OS, along with the Japanese fonts. I know for a fact that this can be done on Windows 2000 and Windows XP, not sure about other Windows versions (you can do this through the Regional Settings/Regional Options in the Control Panel, and installing the Japanese IME/fonts may require the Windows installation CD). You may also need to adjust the regional settings to correctly display Japanese characters on your English Windows system. If you are really interested in getting Japanese input working on your system, please do not e-mail me for support on getting this to work - you really should figure out how to do this on your own (just go to Google and do a search on the groups for "windows japanese software" or something like that - there's plenty of good info out there).
Once you do all of that, you will actually be able to type in Japanese on your system. This also means that you can title tracks in OpenMG Jukebox that are on your harddrive in full Japanese.
|
Display Modes
Below are shots of the main unit's and remote control's LCD's in their various display modes.

[1] Laptime (group/track number, track time elapsed, and track title)
|
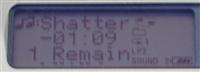

[2] 1 Remain (track name and track time remaining - remote shows track name only)
|
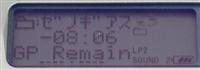

[3] Group Remain (group name and time remaining in current group - remote shows group name only)
|
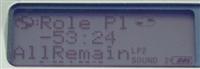

[4] Disc Remain (Disc name and time remaining in entire disc - remote only shows disc name)
|
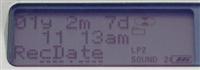

[5] Time/Date Stamp of current recording - progresses as the recording progresses - remote only shows time, not date recorded
|
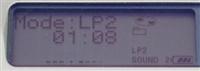

[6] Back to Laptime - display will show the current play mode (SP, LP2, LP4) for two seconds, then return to [1]
|
Recording Notes
During recording, the main unit's LCD will display separate left and right VU meters to indicate the input level of the recording source. The separate meters can be extremely useful for live recording; unfortunately the recording level cannot be set independently for the left and right channels. Recording levels can be adjusted during recording as well as during standby, however you still have to go into the menu to switch the recording mode to MANUAL control every time. For mic-in recordings, the HIGH and LOW sensitivity settings are still there.
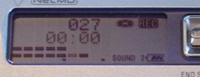
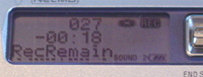
Shots of the LCD during recording: Large VU meter on the left,
smaller VU meter used during "RecRemain" view on the right.
Sync recording is still available only for optical recordings, and not for analog recordings (Sharp has had reliable analog/mic synchro recording for years now, you think Sony might learn). The lack of analog/mic synchro can be a huge pain for those that do a lot of analog recordings from various sources, and this is a feature I sorely miss from my old Sharp 831.
(more of the same...)
While I would love to spend another page or two delving into the depths of the N1's operational details, I would probably end up simply cutting-and-pasting most of my R909 review (since apart from NetMD functionality, the N1's operation is practically identical to the R909). And since much of the focus of the N1 is on its NetMD capabilities, I will move on to the NetMD/OpenMG Jukebox details. Also, keep in mind that a number of limitations of the MD unit itself are offset by what is possible by using the OpenMG Jukebox software (for instance, track-titling and organizing GROUPs on the N1 itself is a pain, but the Jukebox software allows you to title songs and organize groups with ease). If you need more information about the unit (including recording/editing capabilities, sound quality, and extensive information on the GROUP function), have a look through the scans of the user's manual, linked on the left-hand column. Also feel free to read the R909 review (click here).
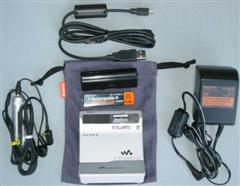
Contents of the MZ-N1 package (not including documentation & software CD):
The N1 main unit, USB/charging cradle, rechargeable NiMH battery, external AA
battery case, remote control, earbuds, 100V AC adapter, USB cable, carrying pouch.
Photo courtesy of Japan-Direct (www.japan-direct.com)
[ Previous Page - Next Page ]
|

)
)
)
)
)
)
)
)
)
)
)
)
)
)
)
)
)
)
)
)
)
)
)
)
)
)
)
)
)
)
)
)
)
)
)
)
)
)