 Images:
)
)
)
)
)
)
)
)
)
)
)
)
)

Index -
Page 1 -
Page 2 -
Page 3 -
Page 4
| II. Appearance and Physical Design |
 Physical Build
The MZ-R909 uses the same physical mold as the R900 (which was very similar to the R90/91, just upside-down). The external casing is exactly the same size as the R900. The body panels are constructed of aluminum, while the trim around the edges is either aluminum or a very hard plastic that is painted silver (I'm really not sure which one). Note that the trim is a bright silver, as opposed to the darker smoke-gray trim used on the R900.
![Sony MZ-R909 [photo courtesy of Japan-Direct.com]](javascript:popUp('R909photos/jd_main.jpg'))
The face design is very clean, although not quite as clean as the R900. The display window is embedded in a larger rectangular indention, which I personally feel could be done without. The unit feels very solidly built with no loose/creaky panels, however the battery door (which was the weakest part of the R900 and R90) remains unchanged. Most R90/91/900 users (including myself) have had problems with the battery door becoming loose after a few months of use, to the point where almost the slightest touch will slide the door open (thus causing the battery to pop out, which causes the unit to lose power... fatal if you are recording or making TOC changes). I'm disappointed that Sony did not improve the design of the battery door, but I'll not dwell on that.
(One tip however: since the battery door is made of plastic, I don't recommend making a habit of leaving your R900/R909 inside a hot parked car. I did, and the battery door on my R900 became warped, and even started cracking, as the battery is perpetually "pushing out" against the battery door. Then again, I live in central Texas...)
Size & Weight
The R909's dimensions are identical to the R900; at its slimmest portions, the measurements are 72 x 78.9 x 17.1 mm, while the protrusions (such as the control pad on the face of the unit, and the eject button on the top of the unit) cause the maximum dimensions to measure 80.0 x 75.5 x 20.5 mm. In terms of mass/weight, the R909 is actually 2 grams heavier than the R900 - 137g vs 135g, including the internal battery. For the purposes of comparison, the Sharp MT770 is thinner and lighter, at 78.9 x 71.9 x 15.7 mm and 128g. Reducing the size of these units has gotten to the point of diminishing returns... any smaller and these MD units would be too small.
Colors & Paint Finish
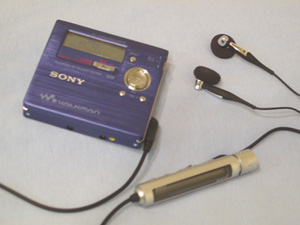
The Japanese model of the R909 is available in three colors - silver, red, and blue. I own the blue model, which I would describe as a warm, metallic blue (almost halfway between blue and purple). The paint finish on the front panel has a horizontal grain, as you can see from the photos. If you move your finger across it horizontally, the finish feels silky-smooth. The back panel is the typical anodized paint job (just like the silver, blue, and red R900's). I don't know what color Sony will make available in other territories (like Europe and North America), but after the US releases of the R90 and R900, I won't even bother speculating (neither the R90 or R900 made it to the States initially in silver, which mystifies me).
![Sony MZ-R909 in silver [press release photos]](javascript:popUp('R909photos/sony_r909_silver.jpg'))
![Sony MZ-R909 in blue [press release photos]](javascript:popUp('R909photos/sony_r909_blue.jpg'))
![Sony MZ-R909 in red [press release photos]](javascript:popUp('R909photos/sony_r909_red.jpg'))
![Sony MZ-R909 in silver, red, and blue [photo courtesy of Japan-Direct.com]](javascript:popUp('R909photos/jd_3colors.jpg'))
Button Layout • User Interface
Sony continues to go with the minimalist approach. Along with the record slider and the control pad, there are a scant 3 buttons on the face of the unit, with two more buttons on the upper-left edge. The GROUP/CANCEL button is featured at the top, next to the display. This allows you to access the GROUP functions (which will be explained in the GROUP FUNCTION section). The volume + and - buttons are located below the control pad. The TMARK and END SEARCH buttons are located on the left edge of the unit (yes, END SEARCH is still there, and it is still the default setting, although it can be disabled in the Rec-Posi menu setting). Gone is the REC MODE button (which allowed the user to toggle through the SP/LP2/LP4/mono modes), and gone is the SYNCHRO REC switch from the back of the unit. These have both been incorporated into the jog dial menu. The HOLD switch (which "locks" all of the controls to prevent accidental button presses) is alone on the back of the unit. Note that the record light is in the middle of the record slider, and this lights up during recording (the small button on the record slider is
translucent).
)
)
The play, pause, stop, and tracking functions are all mapped to a circular playstation-style control pad on the middle-right side of the face. Pushing the pad straight in starts playback, while the four directions of the pad are clearly labeled. Note that the STOP button again doubles as the CHARGE button (the battery can be charged by either plugging in the AC adapter to the unit and pushing STOP/CHARGE, or by sitting the unit on the charging cradle). The control pad gives about a millimeter of play if you jiggle it around, which can make it difficult to push straight in. This can prove a bit frustrating, especially while titling tracks - Sony has implemented a character palette/map system, where the user can move around the "map" of alphabetic characters, and select a letter by pushing the pad straight in. However the mushiness of the control pad makes it difficult to accurately push in - often you might "miss" and end up accidentally pushing up, instead of straight in (just to note, you can still use the jog dial to title tracks in the traditional manner). Only time will tell how much of a frustration this will be.
)
There is one jog dial on the right side of the unit, which is a fully turning dial, and not a jog lever like on the R900 and R90. The jog dial functions like the R900's LEFT jog lever - scrolling up and down allows you to browse through the track titles (even during playback), and subsequently pushing the dial straight in will take you that song. Pushing the dial in without first scrolling takes you into the menus. The R909's menus are even more vast than on the R900 - so much so that Sony dedicated 6 pages of the user's manual to map out all of the menus. Various menu options include the EDIT functions, PLAY MODE, DISPLAY MODE, SOUND PRESETS, CONTRAST control, among others (See the diagrams below for full maps of the menus for all the different play/record modes). The control pad can be used to navigate through the menus (push the pad straight in to select a choice, push the GROUP/CANCEL button to exit out of the menus. Pushing any of the buttons will turn the unit on (except for the Volume buttons, which seem to require two pushes to turn the unit on), and the unit will shut off automatically if you leave it idle for 20 seconds.
)
)
)
The OPEN button is at the top of the unit, just like on the R900, and pressing it will open the lid and eject the disc in one motion - "one touch eject". Sharp seems to have implemented the "one-touch eject" on the MT770 as well, so it seems Sony no longer has an exclusive advantage with the eject mechanism. With the forcefulness of the ejection of a disc, some R90 and R900 users worried that the eject mechanism would wear down over time. However the eject mechanism on my 12-month-old R900 is still working like new, and I haven't heard of any other users having problems, so this doesn't seem to be something that a potential user needs to worry about.
![Left side edge [photo courtesy of Japan-Direct.com]](javascript:popUp('R909photos/jd_leftside.jpg'))
![Top edge, showing the EJECT button [photo courtesy of Japan-Direct.com]](javascript:popUp('R909photos/jd_topside.jpg'))
![Bottom edge, showing external battery connectors [photo courtesy of Japan-Direct.com]](javascript:popUp('R909photos/jd_bottomside.jpg'))
Input / Output Jacks
The locations of the R909 I/O jacks are identical to the locations on the R900. The combined optical/analog line input, mic input (with plug-in power), and headphone/remote/line-out jacks line up on the right edge of the unit. The remote connector is shaped to fit the Sony joint text cable, in case you're one of the few people that actually uses the poorly-implemented Joint-Text feature (which allows you to
transfer CD-TEXT titles from a compatible Sony CD Walkman using a special cable... great concept but poor practical implementation as you still need to sit there and go through a series of button presses for each track... and even poorer still when you consider that almost all CD's with CD-TEXT are "text-protected", which prevents Joint-Text from working at all). Any recent Sony remote should work with the R909 (I tried the R50's remote, and it works fine, albeit missing a couple of buttons). The quality of the mic-input's preamp appears to be the same as that of the R900 and R90. Again, the quality of Sony's mic-preamps seems to have dropped off since the R55-generation.
Line Output
The headphone and line-out jacks are combined into a single port - the headphone/line-out jack. Normally the unit is in HEADPHONE mode, but you can go into the options menu and change the AUDIO OUT setting to LINE OUT, which is recommended if you plug the R909 into an external set of speakers, via a bookshelf system or receiver (but don't plug in a set of headphones while the R909 is in LINE OUT mode - it won't sound good). The AUDIO OUT setting will be stuck in HEADPHONE mode if you have the remote plugged in, so if you want to change it to LINE OUT, you cannot have the remote plugged in (this is bad news if you want to use an external headphone amp and the remote at the same time).
One significant improvement over the R900 and R90: Once the AUDIO OUT mode is set to LINE OUT, it will stay there until you manually change it back, even if the unit powers off - this may sound trivial, but the R900 and R90 would revert back to HEADPHONE mode every time it powered off, which was incredibly annoying. Sony engineers seemed to have finally fixed this on the R909. There is one situation where the R909 will forget to remain in LINE OUT mode, but it is very minor: Normally if the R909 is in LINE OUT mode and you plug the remote into the unit, the R909 automatically switches to HEADPHONE mode. Now if you pull out the remote before the unit powers off, it will switch back to LINE OUT mode for you. But if you leave the remote plugged in, and allow the R909 to power off, then turn the R909 back on and pull out the remote, it will still be in HEADPHONE mode.
And just for comparison purposes: While newer Sony units (and only the high-end units at that, as lower-end MD units don't even have an option for LINE OUT) require the user to go through the options menu to switch the audio output mode to LINE OUT, Sharp units simply have the line-out setting calibrated to volume 30 (Sharp also combines the headphone and line-out jacks into a single port). And in their respective line-out modes, the Sharp units have a slightly louder line-output than Sony units (which is evident in the output specs - 250mV on most Sharp units vs 194mV on Sony units).
The external battery connectors are located on the bottom of the unit, along with the DC input jack. The DC input accepts a 3V DC input. If you import this unit like I did, I highly recommend getting a power supply with the proper specs (again, like the R900, 3V DC, 500+ mA). If you do any damage to your unit by plugging the wrong adapter into the wrong voltage, I'm not liable if you end up with a $300+ paperweight.
| III. Display Window |
Sony has finally implemented a multi-line text display on the main unit's LCD. The R909 has a 3-line text display (which one-ups the Sharp MT77/770's 2-line display), and Sony actually does a good job of implementing it properly (unlike Sharp, which sticks one line with the disc title 24/7). Each line is 9 characters long, and all three lines of the display are used when browsing through the menu options - showing the current option and the options directly before and after - which makes it easier to navigate the menu. The same is done while browsing through the track/group titles.
The indicators and pixels on the display are blue (instead of black, like on the R900). This decreases the readability a bit, but still serves its purpose. The contrast of the display can be adjusted in the options menu - this again is a first. Unfortunately there is no backlight on the main body's LCD. The usual indicators are present, along with a new folder icon for the GROUP modes. There is now a PAUSE symbol next to the REC symbol, which flashes whenever the unit is paused (either during playback or recording). There seem to be 2 indicators that are not used at all, V-UP and V-O-R. I'm not sure what they might have been for, but they sound like they might be functions available on the MZ-B50 (business MD recorder with the built-in mic and speaker). Overall, I love the design of the new display window, although a backlight would really have made things nice.
LCD Color
Observant R900 users might have noticed that on the silver and white models of the R900, the actual background of the LCD was gray, while the blue and red models of the R900 had an orange hue to the LCD. I'm not sure why Sony did this, and I do know (from reading the discussion boards) that many users noticed this. The gray LCD gave better contrast with the black text, and although the orange LCD was not really difficult to read, I did hear some users complain about this. Sony appears not to have done the same with the R909, as (from what I can tell) all three colors of the R909 have the same color (gray) LCD.
Level Meters
There is a 16-dot level meter at the very bottom of the display window, which shows the level in both channels (left and right - I believe this is the first Sony portable with separate L and R level meters). This meter is only used during playback (you get a bigger, easier-to-read meter during recording). The playback meters work like this: They both start from the center, and when there is sound in both channels, the left meter bounces to the left, while the right meter bounces to the right - in effect, they bounce "outwards". So the far left edge is OVER for the left channel, while the far right edge is OVER for the right channel - and the center of the meter is -infinity.
)
)
During recording, the third text line is used as the level meter, while 2 of the dots from the playback meter below it stay lit constantly - one in the middle and one on the right - to indicate the points for -12dB and OVER. The third text line is split in half, so that the top half indicates the level for the left channel, while the bottom half indicates the level for the right channel. If this is too confusing, take a look at the photos - hopefully they will tell the story adequately. It would have been nice if Sony had given users the option to use these larger level meters during playback as well... this is just a minor complaint however.
Display Modes
Thanks to the 3 line text display, the R909 is able to display much more information at one time. In the default display mode during playback, the R909's display shows the track number, the track time elapsed, and the name of the track (finally - all three at once!). Great job by Sony here! When I was testing the Sharp MT77 last year, its two line display disappointed me tremendously, as the MT77's first line of text is dedicated to showing the disc name at all times, without giving the user the option to change display mode for the first line! I'm happy to see that Sony didn't drop the ball like Sharp, however it is a bit odd that the R909's third line usually shows nothing more than the current display mode (in all modes other than the default, in which case it shows the track title). One would think that it might be better to have the third line constantly display the track (or group/disc) name while using the first two lines for track number and time information. But with the vast number of possibilities for the display settings (and since giving the user total control to customize all three lines of the display might have been too confusing), I guess Sony had to go with something. Overall I am fairly pleased, since the default ("lap time") mode gives me pretty much all the info I want.
)
)
| Display Mode: | LapTime | 1 Remain |
RecRemain (during recording) |
GP Remain/ All Remain |
RecDate/ Clock |
| First Line: | Track Number | Track Name | Track Number |
Group Name/ Disc Name |
Date Recorded/ Current Date (i.e., "01y12m25d") |
| Second Line: | Track Time elapsed | Track Time remaining | Available recording time remaining | Group/Disc time remaining |
Time Recorded/ Current Time (i.e., "11:59pm") |
| Third Line: | Track Name | " 1 Remain" | "RecRemain" |
"GP Remain" or "AllRemain" |
"RecDate"/ "Clock" |
Note that wherever a title is displayed (be it track title, disc title, or group name), it will scroll across the display continuously. This is different from previous Sony units, where the title would scroll once and then just "sit" on the display without scrolling again. Also, the title does not scroll smoothly across the display, but instead "stutters" across the text line. This is actually because the 3 lines of text are not actually solid "lines" of text, but instead each line consists of 8 "blocks", with each "block" being the width of one letter (the first two "blocks" of each line are combined, but the rest of them are all separated by one pixel). It's almost as if Sony took a cue from Sharp with both of these quirks. The smooth scrolling of the titles is something I really liked on past Sony units, but is probably something most users can learn to live without.