The rebuilding
Through small alterations, one can the MD -
MT15 improves:!
I adopt no liability for any damages at your appliances!
Until now, there was still the problem that the BOARDS button (at the Minidisc) either by hand, or through a small motor had to be pressed.
If however one the BOARDS button at Titleaid directly connects, then that is no longer necessary.
One must itself the contact to it the BOARDS button outside puts. The best with help of an as small as possible plug. If one is already with it, they should also do that with the EDIT button same!
The low casing is screwed shut with 7 screws. After him/it removes the screws one must still withdraw button the LOVELY and can lift up the low casing-cover then.
Is directly under it in the upper right corner (beside the batteries, a blue flat-band-cable,).
The de-feels of the 2 is from this opinion. Contact from the left and the EDITtaste the right contact (against mass). The most left contact is mass and has something more distance of the other contacts.
On the picture sees your that I have not soldered the cables, that lead to the plug outside, dirket at the plug of the blue flat-band-cable but branches on her/it somewhat further Circuit board. There, it gives nähmlich Lötmesspunkte, at which one can solder it wonderfully, so! Unfortunately, the picture is not so good! If somebody has a better, he/it can like to send it to me!
Now, one must drill nurnoch a small hole into the casing to do about the plug accessible from outside. Unbeding is being kept an eye on it that the contacts of EDIT and BOARDS button the casing by no means it touches since they would cause a duration-contact otherwise!
So my Minidisc Recorder now looks if I cover up music of the PC and have titled afterwards:
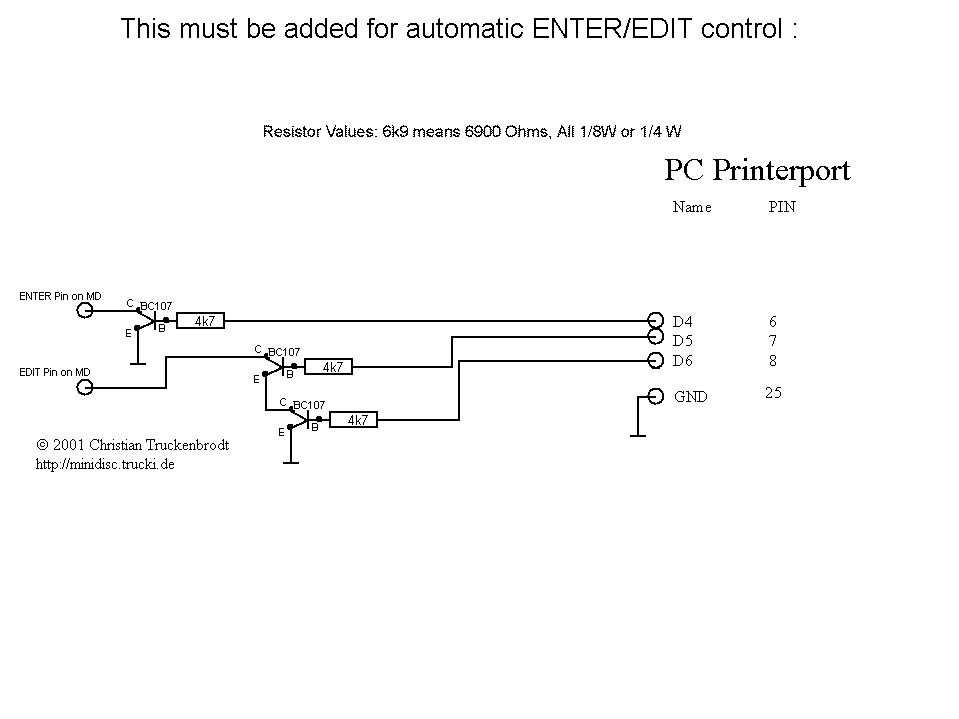
A small rebuilding at the Titleaid circuit board is of course still necessary, about the BOARDS and, to connect EDIT button to the computer.
I can give no guarantee, that it works with these parts, since not I with Conrad Elektronik has shopped!
Here a list of the parts, that your for the rebuilding needs:
|
1 |
2,5 mm mono |
Latch-plugs |
73 28 18 |
1.00 DM |
1067 |
|
1 |
2,5 mm mono |
Socket |
73 39 70 |
1.15 DM |
1067 |
|
3 |
BC 107 AT |
Transistor |
15 35 16 |
0.80 DM |
937 |
|
3 |
4,7kW |
Resistance
¼ |
40 33 34 |
0.19 DM |
993 |
The basis of one transistors, with me BC107 or BC238C, becomes at D4, D5 and D6 in each case, over a 4,7Kohm opposition connected.
Transistor that at D4 hangs:
Emitter at mass.
Collector with the pin in the MD the BOARDS button connects.
Transistor that at D5 hangs:
Emitter at collector of transistor at D6.
Collector with the pin in the MD of the EDIT button connects.
Transistor that at D6 hangs:
Emitter at mass.
Collector at Emitter of transistor at D5.
The transistor at D6 is connected in series the transistor at D5 since +5V lie flat on D5 as long as the program was not yet started. Become D6 is not connected in series, so the EDIT button would be pressed durably as long as the program was not yet started.
