Table of Contents
Next page
Previous page

Notes on Editing
You can edit the recorded tracks after recording, using the following functions:
- Erase Function allows you to erase recorded tracks simply by specifying the corresponding track number.
- Divide Function allows you to divide tracks at specified points so that you can quickly locate those points afterwards, using the AMS function.
- Combine Function allows you to combine two consecutive tracks into one.
- Move Function allows you to change the order of tracks by moving a specific track to a track position you want.
- Title Function allows you to create titles for your recorded MDs and tracks.
If 'Protected' appears in the display
The deck could not edit because the record-protect slot on the MD is open. Edit after closing the slot.
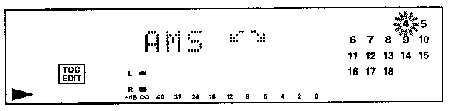
When 'TOC' flashes in the display
Do not move the deck or pull out the AC power cord. After editing, "TOC" lights continuously until you eject the MD or turn off the power. "TOC" flashes while the deck is updating the TOC. When the deck finishes updating the TOC, "TOC" goes off.
Erasing Recordings (Erase Function)
Do the procedures below to erase following:
- A single track
- All tracks
- Portions of a track (A-B Erase)
Erasing a single track
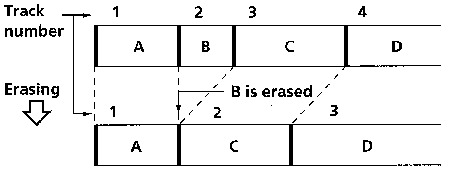
You can erase a track simply by specifying the respective track number.When you erase a track, the total number of tracks on the MD decreases by one and all tracks following the erased one are renumbered. Since erasing merely updates the TOC, there is no need to record over material.
 To avoid confusion when erasing multiple tracks, you should proceed in order of high to low track number to prevent the renumbering of tracks that have not been erased yet.
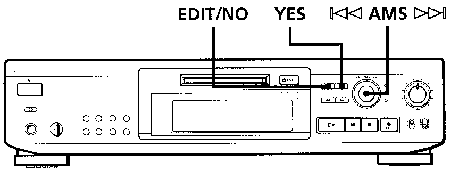
- Turn AMS until the track number you want to erase appears in the display.
- Press EDIT/NO repeatedly until "Erase ?" appears in the display. The track number you selected starts flashing in the music calendar.
- Press YES. When the track selected in Step 1 has been erased, "Complete" appears for a few seconds and the total number of tracks in the music calendar decreases by one. If you erase a track during playback, the track following the deleted track begins playing afterwards.
- Repeat Steps 1 to 3 to erase more tracks.
To cancel the Erase Function
Press EDIT/NO,  , or turn AMS to change the track number.
Note
If "Erase!! ?"appears in the display, the track was recorded or edited on another MD deck and is record-protected. If this indication appears, press YES to erase the track.
Erasing all tracks on an MD
Erasing a recordable MD deletes the disc name, all
recorded tracks, and titles.
- While the deck is stopped, press EDIT/NO repeatedly until "All Erase ?" appears in the display.
- Press YES. All tracks in the music calendar start flashing.
- Press YES again. When the disc name, all recorded tracks, and titles on the MD have been erased, "Complete" appears for a few seconds and the music calendar disappears.
To cancel the Erase Function
Press EDIT/NO or .
You can undo a track erasion
See "Undoing the Last Edit" on page 33.
Erasing a Portion of a Track (A-B Erase Function)
You can easily erase a portion of a track by specifying the starting and ending points of the portion. This function is useful for erasing unnecessary portions on an MD that you recorded from satellite or FM broadcasts.
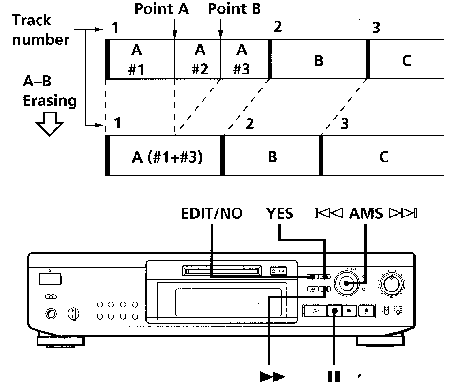
- While playing a disc, press 1 1 at the starting point (point A) of the portion to be erased.
- Press EDIT/NO repeatedly until "A~B Erase ?" appears in the display.
- Press YES. "Rehearsal" alternates with "Point A ok?" in the display and the starting point A of the portion to be erased plays back repeatedly.
- If point A is incorrect, press EDIT/NO. (If it is correct, go to Step 7.)
- While monitoring the sound, turn AMS to find point A. "Rehearsal" alternates with "Point A ok?" in the display and point A is played back repeatedly. Point A can be moved within a maximum range of -128 to +127 steps of about 0.06 second each within a track.
- If point A is still incorrect, repeat Step 5 until it is correct.
- Press YES or AMS when point A is correct. After "Point B Set" appears for a few seconds, "
 " and "A-B" start flashing, and playback begins so that you can set point B.
- Continue playing the track or press
 until you reach the ending point (point B) of the portion to be erased, then press YES. "Rehearsal" alternates with "Point B ok?" in the display, and the "spliced" portion of the track (after the portion from point A to B has been erased) plays back repeatedly, starting a few seconds before point A and ending a few seconds after point B.
- If point B is incorrect, press EDIT/NO. (If it is correct go to Step 12.)
- While monitoring the sound, turn AMS to find point B. "Rehearsal" alternates with "Point B ok?" in the display, and the "spliced" portion of the track (after the portion from point A to B has been erased) plays back repeatedly. Point B can be moved within a maximum range of -128 to +127 steps of about 0.06 second each within a track.
- If point B is still incorrect, repeat Step 10 until it is correct.
- Press YES or AMS when point B is correct. When the portion from point A to B has been erased, "Complete" appears for a few seconds.
To cancel the A-B Erase Function
Press .
Notes
If "Impossible" appears in the display, point B was specified before point A. Specify point B so that it comes after point A.
If "Sorry" appears in the display, a portion of the track cannot be erased. This sometimes happens when you've edited the same track many times, and is due to a technical limitation of the MD system, not a mechanical error.
Dividing Recorded Tracks (Divide Function)
With the Divide Function you can assign a track number at places that you want to randomly access
afterwards. Use this function to add tracks to MDs recorded from an analog source (and therefore contain no track numbers), or to divide an existing track into multiple portions. When you divide a track, the total number of tracks on the MD increases by one and all tracks following the divided track are renumbered.
Example: Dividing track 2 to create a new track for C
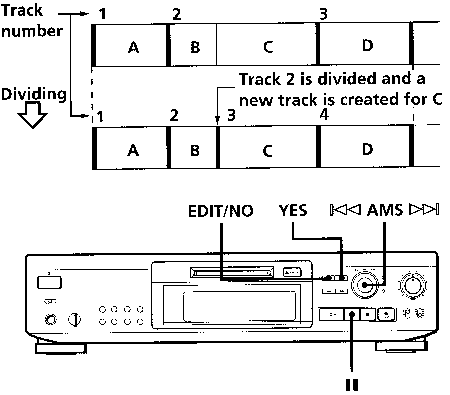
- While playing the MD, press 11 at the point where you want to create a new track. The deck pauses playing.
- Press EDIT/NO repeatedly until "Divide appears in the display.
- Press YES to divide the track. "Rehearsal" alternates with "Position ok?" in the display, the track to be divided starts flashing in the music calendar, and the starting portion of 'the new track begins playing repeatedly.
- If the starting position is incorrect, press EDIT/NO. (If it is correct, go to Step 7.)
- While monitoring the sound, turn AMS to find the starting position of the new track. The starting portion of the new track is played back repeatedly. "Rehearsal" alternates with "Position ok?" in the display. The starting position can be moved within a maximum range of -128 to +127 steps of about 0.06 second each within a track.
- If the starting position is still incorrect, repeat Step 5 until it is correct.
- Press YES or AMS when the position is correct. When the track has been divided, "Complete" appears for a few seconds and the newly created track begins playing. The new track will have no track title even if the original track was labeled.
To cancel the Divide Function
Press .
You can undo a track division
Combine the tracks again (see "Combining Recorded Tracks" on this page) then redivide the tracks if necessary.
You can divide a track while recording
Use the Track Marking Function (see page 15).
Combining Recorded Tracks (Combine Function)
Use the Combine Function while the deck is stopped, playing or in pause to combine consecutive tracks on a recorded MD. This function is useful for combining several songs into a single medley, or several independently recorded portions into a single track. When you combine two tracks, the total number of tracks decreases by one and all tracks following the combined tracks are renumbered.
Example: Combining B and C
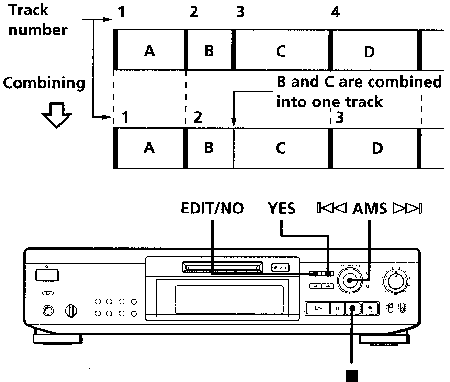
- Turn AMS until the second track of the two to be combined appears. For example, when combining tracks 3 and 4, turn AMS until 4 appears.
- Press EDIT/NO repeatedly until "Combine ?" appears in the display.
- Press YES. "Rehearsal" alternates with "Track ok?" in the display. The place where the two tracks will join (i.e., the end of the first track and the beginning of the second track) repeatedly plays back and the respective track number flashes in the music calendar.
- If the track is the wrong one, press EDIT/NO or , then start from Step 1 again.
- If the place is correct, press YES. When the tracks have been combined, "Complete" appears for a few seconds and the total number of tracks in the music calendar decreases by one. If both of the combined tracks have track titles, the title of the second track is erased.
sol>
To cancel the Combine Function
Press EDIT/NO or .
You can undo a track combination
Divide the tracks again (see "Dividing Recorded Tracks" on page 28), then repeat the combine function with the correct tracks if necessary.
Note
If "Sorry" appears in the display, the tracks cannot be combined. This sometimes happens when you've edited the same track many times' and is due to a technical limitation of the MD system, not a mechanical error.
Table of Contents
Next page
Previous page
HTML-ized by Mario Zlatovic