Editor's Note: I didn't create this device. The original page is still up, but it's on a free web service that has been taken over by the evil minions of advertising. I'm mirroring it for the public good until I can find the author and get permission or make some other arrangement. I've cleaned up the markup, but otherwise the page is preserved as the origial author wrote it.
Yeah, MiniDisc is great, so that's not a point to discuss. The reason for this page is that many people have difficulties to accept the fact that you cannot change recording level while recording from an analogue source on a portable Sony MD recorder.
On Sony's portable MD's you set analogue recording level digitally, however on their stationary models recording level is set analogue using a potentiometer (the thing you'll turn to set recording level).
So what the point? The point is that you can build an external box with a (stereo) potentiometer! You may not like the idea, but let me tell you about the features of this box:
Sounds Great! How can I make such a controller?
Well, first of all you'll need to know how to solder. If you don't know, ask your friend or someone else.
Then you'll need these few things to build your controller:
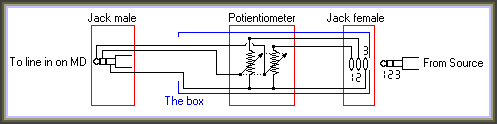
| Walkmansize stereo male
jack connector (like found on headphones etc, if you're critic about soundquality
use Gold plated connectors). Walkmansize stereo wall mounting female jack connector. Some wires (if critic, use a shielded wire to the male connector). A quality stereo potentiometer 22 K Ohm logaritmic (B) (again, if you're critic use a special audio potentiometer). A knob to turn the potientiometer with. And last: A little plastic box to put the potentiometer and female jack connector in. And maybe 4 feets for the box - if you want the box to have feets. |
Before telling how to put it all together, I'll show you the diagram:
As you can see it's nothing special. Just a potientiometer to perform a drop on the output.
Assembling the controller is very easy: Drill three holes in the box. One for the potentiometer, one for the female jack connector and one for the wires to the male jack connector. Put portientiometer and female connector in place and solder it together as shown in the diagram.
If you're not using a special audio potentiometer I recommend spraying the inside (if posible without opening it) of the potientiometer with contact spray, then turn the knob a few times. Cheep potentiometers are likely to have a scratching sound when used in audio applications - but should disapear with a bit of contact spray.
All there is to do left is assembling the box (with screws, if any) and add feet to the box - if you want.
Finnished and..... try the controller!
If you want to see some pictures of my controller click here...
However, I'll not answer any question on how to solder - I'm sure you can find a book about that in the library! Or try another website :-) .
IMPORTANT NOTE!:
I'm NOT responsible for any damage to your gear or anything else happening by the
use, abuse or misuse of this information!! However, damaging your gear just by building
and using this controller is very unlikely since this controller in no way does alter your
gear.
(pictures of what's inside is located
at the end)

At this picture you'll see the assembled
controller. The box itself is about 8 * 5 * 3 cm.
"IN" is for the source's lineout (or headphone, if there no lineout).
"OUT" is for line in on the MD device.
You'll notice that the "IN" is same size female jack connecter as you'll
find on your MD line in.
Note that I'm using a gold-plated male jack connector and a (I know you
can't see it) shielded wire.

Yet another picture of the controller.

At this picture you'll see what's inside the controller. Not much - just the stereo potentiometer, a wall mounting female jack connector and some wires.
As you can see the potentiomener is not special just an ordinary potentiometer. That's because I found the audio potentiometer my shop could offer was too big and I needed a bigger box. However, I havn't had any problems with sound quality yet.
If you're not using an audio potentiometer I recommend spraying the the inside of the potentiometer with contact spray, then turn the knob a few times. With my potientiometer there first was a scratching sound but it disapeared with a bit of contact spray.

Just another picture of what's inside. Notice the way the long wire is fastned. Not with a knot but with a hot glue gun. Just to make sure that the wire won't move inside the box and cause loose connections and/or short circuit anything - again causing your recording to be destroyed because of a loud signal level or no signal at all.